I noticed my front brakes were bindng, so I loosened the left caliper and the wheel revolved freely. Ok so I removed the pads and pumped the brake lever to see what was going on, the inner pistons moved easily and the lower outer moved very slow the upper one didn't move. Outer pistons dont want to go back in.
Next I installed a set of worn out pads and retightened the caliper and was able to pump the stuck piston out enough to give it a clean. I gave all four pistons a good clean and lubed them with some fresh brake fluid.
Usually after doing this I can push the pistons back in by hand but not this time the top outer pistons are not for budging. The lower one is only going back half way.
So I'm thinking it's time for an overhaul, has anyone had a go at splitting BMW (Toxico on the rear) calipers and replaced the seals. Haynes manual says it's a no go area and I'm not liking the idea of paying £160 for a used caliper.
Stuck brake piston
Moderator: Moderators
-
hank

- Basic User
- Posts: 282
- Joined: Sun Oct 15, 2006 5:30 pm
- Location: On the Lost Highway, Scotland.
- Contact:
Stuck brake piston
I'm a rollin stone all alone and lost...............
-
CycleRob

- Honorary Lifer
- Posts: 2857
- Joined: Mon Mar 21, 2005 12:29 am
- Location: Enjoying retirement in Gainesville GA. USA
- Contact:
Re: Stuck brake piston
"Haynes manual says it's a no go area . . . " (taking the calipers apart) 
HUH??? Sounds like they lawyer'd-up.
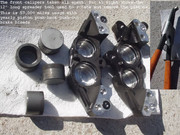
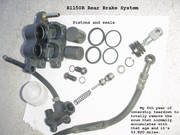
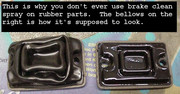
Removing the pistons is made easy if you use the brake lever (or pedal) to extend all the pistons of just one caliper (other front caliper is still fully installed), using parts like a 3/8ths drive extension then a 1/4 inch drive extension held in place with other tools to EVENLY extend all pistons by slowly pumping the lever/pedal. They then can be turned, wiggled and withdrawn. Just be careful you do not scratch the machined rubber seal trench in the Aluminum caliper casting when removing the seals for hand cleaning. You must NOT use brake clean sprays on any rubber parts. With caliper piston seals it will accelerate age hardening, shorten their lives, causing the brakes to stay ON after being applied. On some rubber parts it does something else:
Use a paper towel and an old toothbrush wet with new brake fluid as a manual cleaner. NEVER-EVER use fine grit sandpaper to "clean" a discolored piston surface. On some Hondas, that non uniform brownish looking film is an aged low friction coating. If there are rust pits, with BMW you are looking at a new caliper assembly. If all went well so far, use a clean gloved finger dipped in new DOT-4 brake fluid to coat the re-installed seals and piston seal surface for easy, nearly force free insertion when you turn the pistons as you push them in axially.
.
HUH??? Sounds like they lawyer'd-up.
Removing the pistons is made easy if you use the brake lever (or pedal) to extend all the pistons of just one caliper (other front caliper is still fully installed), using parts like a 3/8ths drive extension then a 1/4 inch drive extension held in place with other tools to EVENLY extend all pistons by slowly pumping the lever/pedal. They then can be turned, wiggled and withdrawn. Just be careful you do not scratch the machined rubber seal trench in the Aluminum caliper casting when removing the seals for hand cleaning. You must NOT use brake clean sprays on any rubber parts. With caliper piston seals it will accelerate age hardening, shorten their lives, causing the brakes to stay ON after being applied. On some rubber parts it does something else:
Use a paper towel and an old toothbrush wet with new brake fluid as a manual cleaner. NEVER-EVER use fine grit sandpaper to "clean" a discolored piston surface. On some Hondas, that non uniform brownish looking film is an aged low friction coating. If there are rust pits, with BMW you are looking at a new caliper assembly. If all went well so far, use a clean gloved finger dipped in new DOT-4 brake fluid to coat the re-installed seals and piston seal surface for easy, nearly force free insertion when you turn the pistons as you push them in axially.
.
Last edited by CycleRob on Fri Jul 26, 2019 5:47 pm, edited 1 time in total.
`09 F800ST
Member since Sept 10, 2001
"Talent, On Loan, From God" --Rush Limbaugh--
Member since Sept 10, 2001
"Talent, On Loan, From God" --Rush Limbaugh--
Re: Stuck brake piston
Uh oh, a few months ago I removed and replaced my brake pads, and used a bunch of brake cleaning spray to clean out the calipers....You must NOT use brake clean sprays on any rubber parts. It will shorten their lives and accelerate age hardening, causing the brakes to stay ON after being applied

What have I done???

Lord tell me I have not ruined my brakes Cyclerob.

2002 R1150R
"Better is the enemy of good enough"
- my brother-in-law's brother
"Better is the enemy of good enough"
- my brother-in-law's brother
Re: Stuck brake piston
Uh oh, a few months ago I removed and replaced my brake pads, and used a bunch of brake cleaning spray to clean out the calipers....You must NOT use brake clean sprays on any rubber parts. It will shorten their lives and accelerate age hardening, causing the brakes to stay ON after being applied
What have I done???
Lord tell me I have not ruined my brakes Cyclerob.
2002 R1150R
"Better is the enemy of good enough"
- my brother-in-law's brother
"Better is the enemy of good enough"
- my brother-in-law's brother
-
riceburner

- Basic User
- Posts: 3809
- Joined: Fri Mar 18, 2005 7:54 am
- Location: Hiding in your blind spot....
- Contact:
Re: Stuck brake piston
hank wrote:I noticed my front brakes were bindng, so I loosened the left caliper and the wheel revolved freely. Ok so I removed the pads and pumped the brake lever to see what was going on, the inner pistons moved easily and the lower outer moved very slow the upper one didn't move. Outer pistons dont want to go back in.
Next I installed a set of worn out pads and retightened the caliper and was able to pump the stuck piston out enough to give it a clean. I gave all four pistons a good clean and lubed them with some fresh brake fluid.
Usually after doing this I can push the pistons back in by hand but not this time the top outer pistons are not for budging. The lower one is only going back half way.
So I'm thinking it's time for an overhaul, has anyone had a go at splitting BMW (Toxico on the rear) calipers and replaced the seals. Haynes manual says it's a no go area and I'm not liking the idea of paying £160 for a used caliper.
BMW won't supply the 'inner seals' that seal the channels between the calliper halves. I source mine from a Kawasaki dealer (the vast majority of Kawasakis use Tokico callipers).
Will look to see if I have the part number in my emails.
Edit - Dang - must have ordered them over the phone. Will see if I can dig out the receipt when I'm at home.
One thing to be VERY careful of with the BMW/Tokico callipers is the bolts holding them together - you'll need a fair bit of force to get them to start turning, so plenty of loosening spray on the openings at the back a few days before hand is a good idea - and try to apply the force very gently - so you don't overload the stupid TORX bolt heads - I've mauled a bolt head AND broken a Torx tool (on different occasions) trying to free off the calliper clamping bolts.
One trick I found recently is to pumpout the pistons while the calliper is on the bike. If the disc is very new it'll be 'just' thick enough to prevent the pistons popping out completely so you can get all 4 pistons in a calliper to maximum extension before undoing the clamp bolts (again - easier while the calliper is on the bike if you don't have a solidly mounted heavy duty vice).
Once the calliper has been split you can pull out the pistons relatively easily. TBH I tend to use a pair of mole grips and destroy the pistons in the process - Tokico pistons are pretty cheaply made so will scratch and scar far too easily. The renewal kit from BMW comes with all the pistons and seals anyway so I'd heartily recommend replacing the pistons as a matter of course.
To clean the callipers out I use a suede brush (with brass bristles) and a dentists pick. used with care you won't do any damage - but you need something pretty robust to clean out the corrosion that can gather in the seal beds. With the seals removed you can use brake cleaner liberally to clean the corrosion and crap out.
Remember to remove the bleed nipples and another other accoutrements so that you can clean out all the channels in each calliper half. Also clean out the seal beds in the mating surfaces - where the mating seals go - these surfaces can get pretty corroded too.
Another thing I tend to do is take a whetstone (knive sharpening stone) and use it to clean off the mating surfaces of the calliper halves. The sharp corners tend to corrode and if left uncleaned the halves won't mate cleanly on reassembly.
Make sure the calliper halves are fully dried of any brake cleaner before re-introducing the seals and pistons. Like CycleRob suggests - coating the seals and outer surface of the pistons before reassembly will help enormously.
DON'T soak the small seals that go between the mating surfaces though!

The rest of the reassembly is relatively straightforward. Then you've got to bleed them....
Last edited by riceburner on Tue Aug 27, 2013 4:47 am, edited 2 times in total.
-
riceburner
- Basic User
- Posts: 3809
- Joined: Fri Mar 18, 2005 7:54 am
- Location: Hiding in your blind spot....
- Contact:
Re: Stuck brake piston
sstein wrote:Uh oh, a few months ago I removed and replaced my brake pads, and used a bunch of brake cleaning spray to clean out the calipers....You must NOT use brake clean sprays on any rubber parts. It will shorten their lives and accelerate age hardening, causing the brakes to stay ON after being applied
What have I done???
Lord tell me I have not ruined my brakes Cyclerob.
no - you haven't done a huge amount of damage. Brake cleaner will damage the seals if it's left in prolonged contact with the silicon-rubber material. But if you cleaned if off straight away then you shouldn't have done any harm to the seals. (it evaporates off pretty quickly anyway if in a well-ventilated area).
-
CycleRob
- Honorary Lifer
- Posts: 2857
- Joined: Mon Mar 21, 2005 12:29 am
- Location: Enjoying retirement in Gainesville GA. USA
- Contact:
Re: Stuck brake piston
At worst the brake clean sprayed on liquid may get past the outer part of the outer dust shield O-ring, which has a "U" shaped cross section, where the top of the U bears against the piston surface. That small U shaped air chamber could hold the brake cleaner and eventually dry out the rubber's natural soft flexibility. That won't cause the pistons to hang up right away but the accelerated rubber hardening will compromise its intended function. If you remove the pistons and seals you will learn that these outer dust shields take much longer to clean than the actual piston seals because they trap the crud that works its way past the outer edge of the seal. I use a paper towel bit soaked in DOT-4 to grip the outer dust seal between it's ID and OD as it is continually pulled thru the towel in small steps. You'll then see on the towel just how much crud was jammed in there. It may have been so clogged up that the U channel will suddenly appear. Be careful to NOT grip it too tightly as its small cross section could snap if the tension is too high. These instructions will all be clearer when you have the parts in your hands.
EDIT: When updating the dead links, a better solution was found:
http://r1150r.org/board/viewtopic.php?f=26&t=30659
EDIT: When updating the dead links, a better solution was found:
http://r1150r.org/board/viewtopic.php?f=26&t=30659
Last edited by CycleRob on Fri Jul 26, 2019 6:37 pm, edited 1 time in total.
`09 F800ST
Member since Sept 10, 2001
"Talent, On Loan, From God" --Rush Limbaugh--
Member since Sept 10, 2001
"Talent, On Loan, From God" --Rush Limbaugh--
-
hank
- Basic User
- Posts: 282
- Joined: Sun Oct 15, 2006 5:30 pm
- Location: On the Lost Highway, Scotland.
- Contact:
Re: Stuck brake piston
Caliper refurb kit is in the post from Sherlocks, will probably split the caliper tomorrow evening. Bleeding the brakes is the part I am least looking forward to, always been a bitch on this bike.
I'm a rollin stone all alone and lost...............
-
captaincable
- Basic User
- Posts: 202
- Joined: Mon Jul 09, 2012 7:01 pm
- Location: N.E. Georgia
Re: Stuck brake piston
If you follow CycleRobs advice and find his posts it will be a breeze , I could not believe how fast he bled my brakes and replaced the fluid as well ,that was with me getting in his way 
Have fun
Mike
Have fun
Mike
-
riceburner
- Basic User
- Posts: 3809
- Joined: Fri Mar 18, 2005 7:54 am
- Location: Hiding in your blind spot....
- Contact:
Re: Stuck brake piston
Hank - do NOT split the calipers until you have the new internal seals. you can't re-use the buggers.hank wrote:Caliper refurb kit is in the post from Sherlocks, will probably split the caliper tomorrow evening. Bleeding the brakes is the part I am least looking forward to, always been a bitch on this bike.
 (I tried this once - they never sealed properly again.)
I got distracted by the wife last night - will look up the Kawasaki part numbers this evening for you when I get back from archery.
-
hank
- Basic User
- Posts: 282
- Joined: Sun Oct 15, 2006 5:30 pm
- Location: On the Lost Highway, Scotland.
- Contact:
Re: Stuck brake piston
riceburner wrote:
Hank - do NOT split the calipers until you have the new internal seals. you can't re-use the buggers.
I got distracted by the wife last night - will look up the Kawasaki part numbers this evening for you when I get back from archery.
Thanks Riceburner, I just hope you see this before you go searching for the part numbers.
I got some info from UKGSER with part numbers from Kawasaki and Honda. Kawasaki (part no. 43049- 1004) and Honda (part no. 45103-MEL-003). I visited my local Honda dealer this morning and picked up the seals for £1.54 each. So I'm off to the garage to do battle.
I'm a rollin stone all alone and lost...............
-
riceburner
- Basic User
- Posts: 3809
- Joined: Fri Mar 18, 2005 7:54 am
- Location: Hiding in your blind spot....
- Contact:
Re: Stuck brake piston
hank wrote:riceburner wrote:
Hank - do NOT split the calipers until you have the new internal seals. you can't re-use the buggers.
I got distracted by the wife last night - will look up the Kawasaki part numbers this evening for you when I get back from archery.
Thanks Riceburner, I just hope you see this before you go searching for the part numbers.
I got some info from UKGSER with part numbers from Kawasaki and Honda. Kawasaki (part no. 43049- 1004) and Honda (part no. 45103-MEL-003). I visited my local Honda dealer this morning and picked up the seals for £1.54 each. So I'm off to the garage to do battle.
Found it (blimey, bought them this time last year!). That Kawasaki part number matches the invoice I've got here.
Good luck!
-
hank
- Basic User
- Posts: 282
- Joined: Sun Oct 15, 2006 5:30 pm
- Location: On the Lost Highway, Scotland.
- Contact:
Re: Stuck brake piston
Ok, got the brakes fixed. Removed the banjo and put the end of the pipe in a finger cut from a latex glove held in place with a ziptie to stop all the fluid draining out.
Then I got my T40 socket and set about carefully losening the bolts that hold the two halves of the caliper together. First two bolts came lose ok, the third one didn't want to budge.
So I moved on to the fourth bolt, it gave a bit of a creak as it loosened the first quarter turn. I then went back to the stubborn third bolt and tried again,bang, I shouted a couple of four letter words and thought well thats me really in the crap now.
What I thought was the bolt shearing off was actually my T40 socket snapping. So off I go to the tool store and buy another socket. Before trying to loosen the bolt this time, I put the socket on it and tapped it repeatedly with a light hammer for a couple of minutes before attempting to losen it. This time when I applied pressure with my small breaker bar the bolt came loose with out too much fuss.
With all four bolts now loose I undid the two mounting bolts and removed the caliperfrom the bike. Got the caliper on the bench and removed the four bolts and seperated it. I used a pair of pliers to remove the pistons, I had a new set ready to install so I wasn't worried about damageing the old ones. To avoid damaging the cylinder I used a toothpick to remove the old seals. The dust seals looked old and battered the inner seals didn't look too bad, but I they are getting binned.
I gave the inside of the calper halves a good blast of brake cleaner and wiped them clean with kitchen towel. There was a bit of corrosion in the ring where the dust seal fits, this was cleaned out with a brass suede brush soaked in clean brake fluid. After another couple of sessions with the brake cleaner and kitchen towel, the new seals were then installed and the new pistons lubed with clean brake fluid before pushing them gently into place. The new seals that go between the two halves were fitted and then the caliper was bolted back together. I finished tightening the four bolts once the caliper was installed on the bike.
Once I had the brake pads reinstalled I opened the bleed nipple and used a piece of tube and a small funnel to pour brake fluid into the caliper through the hole where the brake hose fits. This made bleeding the brakes a much easier job. I had the brakes bled in five minutes, easiest brake bleed ever on this bike.
Had the bike out today for a wee hundred mile run on twisty roads, gentle on the way out and spirited on the way home. The brakes feel better than they have in a long time and there are no signs of fluid weeping around the caliper. So jobs a goodun.
Thanks again guys for your help and encoragement.
Then I got my T40 socket and set about carefully losening the bolts that hold the two halves of the caliper together. First two bolts came lose ok, the third one didn't want to budge.
So I moved on to the fourth bolt, it gave a bit of a creak as it loosened the first quarter turn. I then went back to the stubborn third bolt and tried again,bang, I shouted a couple of four letter words and thought well thats me really in the crap now.
What I thought was the bolt shearing off was actually my T40 socket snapping. So off I go to the tool store and buy another socket. Before trying to loosen the bolt this time, I put the socket on it and tapped it repeatedly with a light hammer for a couple of minutes before attempting to losen it. This time when I applied pressure with my small breaker bar the bolt came loose with out too much fuss.
With all four bolts now loose I undid the two mounting bolts and removed the caliperfrom the bike. Got the caliper on the bench and removed the four bolts and seperated it. I used a pair of pliers to remove the pistons, I had a new set ready to install so I wasn't worried about damageing the old ones. To avoid damaging the cylinder I used a toothpick to remove the old seals. The dust seals looked old and battered the inner seals didn't look too bad, but I they are getting binned.
I gave the inside of the calper halves a good blast of brake cleaner and wiped them clean with kitchen towel. There was a bit of corrosion in the ring where the dust seal fits, this was cleaned out with a brass suede brush soaked in clean brake fluid. After another couple of sessions with the brake cleaner and kitchen towel, the new seals were then installed and the new pistons lubed with clean brake fluid before pushing them gently into place. The new seals that go between the two halves were fitted and then the caliper was bolted back together. I finished tightening the four bolts once the caliper was installed on the bike.
Once I had the brake pads reinstalled I opened the bleed nipple and used a piece of tube and a small funnel to pour brake fluid into the caliper through the hole where the brake hose fits. This made bleeding the brakes a much easier job. I had the brakes bled in five minutes, easiest brake bleed ever on this bike.
Had the bike out today for a wee hundred mile run on twisty roads, gentle on the way out and spirited on the way home. The brakes feel better than they have in a long time and there are no signs of fluid weeping around the caliper. So jobs a goodun.
Thanks again guys for your help and encoragement.
I'm a rollin stone all alone and lost...............
-
riceburner
- Basic User
- Posts: 3809
- Joined: Fri Mar 18, 2005 7:54 am
- Location: Hiding in your blind spot....
- Contact:
Re: Stuck brake piston
hank wrote:Ok, got the brakes fixed. Removed the banjo and put the end of the pipe in a finger cut from a latex glove held in place with a ziptie to stop all the fluid draining out.
Then I got my T40 socket and set about carefully losening the bolts that hold the two halves of the caliper together. First two bolts came lose ok, the third one didn't want to budge.
So I moved on to the fourth bolt, it gave a bit of a creak as it loosened the first quarter turn. I then went back to the stubborn third bolt and tried again,bang, I shouted a couple of four letter words and thought well thats me really in the crap now.
What I thought was the bolt shearing off was actually my T40 socket snapping. So off I go to the tool store and buy another socket. Before trying to loosen the bolt this time, I put the socket on it and tapped it repeatedly with a light hammer for a couple of minutes before attempting to losen it. This time when I applied pressure with my small breaker bar the bolt came loose with out too much fuss.
With all four bolts now loose I undid the two mounting bolts and removed the caliperfrom the bike. Got the caliper on the bench and removed the four bolts and seperated it. I used a pair of pliers to remove the pistons, I had a new set ready to install so I wasn't worried about damageing the old ones. To avoid damaging the cylinder I used a toothpick to remove the old seals. The dust seals looked old and battered the inner seals didn't look too bad, but I they are getting binned.
I gave the inside of the calper halves a good blast of brake cleaner and wiped them clean with kitchen towel. There was a bit of corrosion in the ring where the dust seal fits, this was cleaned out with a brass suede brush soaked in clean brake fluid. After another couple of sessions with the brake cleaner and kitchen towel, the new seals were then installed and the new pistons lubed with clean brake fluid before pushing them gently into place. The new seals that go between the two halves were fitted and then the caliper was bolted back together. I finished tightening the four bolts once the caliper was installed on the bike.
Once I had the brake pads reinstalled I opened the bleed nipple and used a piece of tube and a small funnel to pour brake fluid into the caliper through the hole where the brake hose fits. This made bleeding the brakes a much easier job. I had the brakes bled in five minutes, easiest brake bleed ever on this bike.
Had the bike out today for a wee hundred mile run on twisty roads, gentle on the way out and spirited on the way home. The brakes feel better than they have in a long time and there are no signs of fluid weeping around the caliper. So jobs a goodun.
Thanks again guys for your help and encoragement.
Good stuff - well done.
Re: Stuck brake piston
Excellent description. Just made my to-do list one item longer. I'll bet those brakes feel great.
2002 R1150R
"Better is the enemy of good enough"
- my brother-in-law's brother
"Better is the enemy of good enough"
- my brother-in-law's brother