III. Flushing front wheel circuits-- ALTERNATIVE outline
------A. Flushing the fluid from the reservoir to bleed valve--left side
------------1. Open cap on reservoir and draw off excess old fluid
------------2. Fill reservoir with fresh fluid
------------3. Attach filling device
------------4. Fill filling device with fresh fluid
------------5. Open bleed nipple--10mm
------------6. Turn on bike
------------7. Operate brake lever until fluid is bubble free and new fluid is exiting nipple
------------8. Close bleed nipple--9nm
------------9. Turn off bike
------B. Flushing the fluid from reservoir to bleed valve--right side
------------1. Fill filling device with fresh fluid
------------2. Open bleed nipple--10mm
------------3. Turn on bike
------------4. Operate brake lever until fluid is bubble free and new fluid is exiting nipple
------------5. Close bleed nipple--9 nm
------------6. Turn off bike
------------7. Remove filling device
------C. Flushing remaining fluid from left caliper
------------1. Remove caliper bolts
----------------a. Remove wire restraints holding brake line and wheel sensor wire
------------2. Slide caliper up and off the rotor
------------3. Remove retaining plate
------------4. Remove split pin and retaining pin
------------5. Remove brake pads
-----------*6. Clean caliper and pistons
-----------------a. Extend pistons
-----------------b. Clean pistons
-----------------c. Clean around seals
-------------7. Squeeze front brake lever
-----------------a. Zip-tie brake lever
-----------------b. Fill reservoir with fresh fluid
-------------8. Open bleed valve
-------------9. Push pistons in
------------10. Close bleed valve--9nm
------------11. Cut Zip-tie
------------12. Extend pistons again
------------13. Repeat steps above 7-12 again
------------------a. Repeat steps 7-12, as many times necessary, until there are absolutely no solids or brown fluid remaining.
------------------b. When perfect fluid is exiting caliper, do not do step 12 (extending the pistons) the final time
------------14. Clean left side pads and rotor with brake cleaner
------------15. Reinstallation of left caliper
----------------a. Install pads and retaining pin
----------------b. Replace split pin
----------------c. Replace retaining plate
----------------d. Replace caliper on rotors
----------------e. Torque caliper bolts--30 nm
----------------f. Replace sensor wire restraints
-------------16. Operate brake several times to extend pistons and set pads against rotors
------ D. Flushing fluid from right caliper
------------1. Remove caliper bolts
------------2. Slide caliper up and off the rotor
------------3. Remove retaining plate
------------4. Remove split pin and retaining pin
------------5. Remove brake pads
-----------*6. Clean caliper and pistons
-----------------a. Extend pistons
-----------------b. Clean pistons
-----------------c. Clean around seals
-------------7. Squeeze front brake lever
-----------------a. Zip-tie brake lever
-----------------b. fill reservoir with fresh fluid
-------------8. Open bleed valve
-------------9. Push pistons in
------------10. Close bleed valve-9nm
------------11. Cut Zip-tie
------------12. Extend pistons again
------------13. Repeat steps above 7-12 again
-----------------a. Repeat steps 7-12, as many times necessary, to remove all brown fluid and gunk
-----------------b. When perfect fluid is exiting caliper, do not do step 12 (extending the pistons) the final time
------------14. Clean right side pads and rotor with brake cleaner
------------15. Reinstallation of right caliper
----------------a. Install pads and retaining pin
----------------b. Replace split pin
----------------c. Replace retaining plate
----------------d. Replace caliper on rotors
----------------e. Torque caliper bolts--30 nm
-------------16. Operate brake several times to extend pistons and set pads against rotors
-------E. Final check on fluid level
--------------1. Replace reservoir cap
III. Flushing front wheel ciruits ALTERNATIVE detailed instructions
A. Flushing the fluid from reservoir to bleed valve--left side
Like the rear wheel circuit, we will first flush the reservoir and brake line to the bleed valve. Most of the pictures are taken from the right hand side. The lighting was better on that side to take pictures. But, you should be doing the left side first.
1. Open cap on reservoir and draw off excess old fluid
The same procedure as on the rear. The reservoir for the front brakes is skillfully circled in red below.

2. Fill reservoir with fresh fluid
3. Attach filling device
Yes, attach it to the FRONT reservoir this time
4. Fill filling device with fresh fluid
5. Open left caliper bleed nipple--10mm
Yeah, a bigger wrench than the rear caliper used...but still the same idea. Once again, gravity will start the process. You did attach tubing to the nipple to drain the old fluid, right?

6. Turn on bike
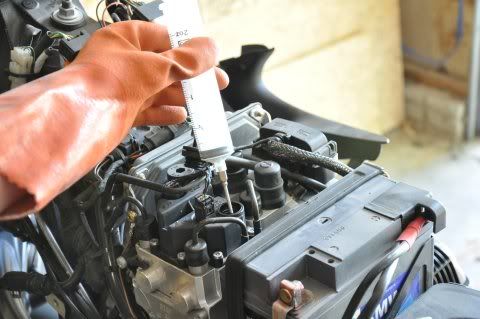
7. Operate brake lever until fluid is bubble free and new fluid is exiting nipple
Here is an action shot... just imagine that the left caliper is being done...

8. Close bleed nipple--9nm
Don't break it
9. Turn off bike
B. Flushing the fluid from reservoir to bleed valve--right side
This is the same as was done on the left. The only difference is that the reservoir is already filled with fresh fluid, so the "old" fluid does not need to be drawn off.
1. Fill filling device with fresh fluid
2. Open bleed nipple--10mm
Don't forget the drain tube.
3. Turn on bike
4. Operate brake lever until fluid is bubble free and new fluid is exiting nipple
5. Close bleed nipple--9 nm
6. Turn off bike
7. Remove filling device
C. Flushing remaining fluid from left caliper
This is the extra punishment for neglecting the brakes on the front wheel. Some of the photos below are from the right hand side (you should be doing the left side)... but the instructions are the same.
1. Remove caliper bolts
Two T45s again, self-explanatory.
a. Remove wire restraints holding brake line and wheel sensor wire
I also leave the front wheel senor in place (I hate the clips that hold the sensor wire, they are in an awkward place). Undo the plastic wire restraints on the mud guard so that the brake line is not bound to the sensor wire.

2. Slide caliper up and off the rotor
There is even less room to move the caliper off the rotor than on the rear. Be VERY careful not to bang up the paint on the wheels. Here, it is REALLY REALLY suggested that tape be applied to the wheel to protect it from scratching. Also, there is not much slack in the brake line, don't force anything. Once the caliper is slid to the outer edge of the rotor, it may seem that there is no way it will come off. It will. Tip the side of the caliper with the shiny retaining plate towards the outside (towards yourself) and keep wiggling slightly (always careful of the wheels).
3. Remove retaining plate
Two small 3mm hex bolts hold it on. The retaining plate is sprung (bent under pressure). When the first 3mm bolt is removed the plate will un-spring. Don't let this un-springing plate launch the small bolt. Now, loosen the other bolt.

4. Remove split pin and retaining pin
Once the split pin is out...the retaining pin just slides out the outboard hole.

5. Remove brake pads
*6. Clean caliper and pistons
a. Extend pistons
This is similar to the rear caliper. The only difference is that the front calipers have 4 pistons. The 4 pistons set-up can make this more annoying. Inevitably on of the pistons will move faster than the rest. One will probably not want to move much at all. So be creative in blocking the faster moving ones to get the slower ones to extend. One opposing pair of pistons can be blocked in place easily, with something like a screw driver handle or a block of wood. Then hold one of the other pistons with your fingers... and pump brake lever to extend the last one. Just extend them far enough to clean the ring of grime around the pistons. Pump the brakes with bike turned off! Do not use the servo pump.

b. Clean pistons
Oh, the satisfaction...

c. Clean around seals
Wipe out the interior of the caliper.
7. Squeeze front brake lever
Squeeze it and hold there with good pressure. (Have zip tie in hand for the next step!) This ensures that in the following steps the old fluid in the calipers is not pushed up into the brake lines.
a. Zip-tie brake lever
This will hold the pressure, while you push the old fluid out of the caliper. You are going to need to use several zip-ties in the near future. Or you might want to enlist a helper to hold the brake lever instead.
b. Fill reservoir with fresh fluid
You don't want to let the reservoir run dry! This is very important.
8. Open bleed valve
With the pressure applied from the lever, the fluid will initially shoot up pretty quicky.
9. Push pistons in
This pushes the old fluid in the caliper directly out the bleed valve. Make sure all four pistons get pressed in fully.
10. Close bleed valve--9nm
11. Cut Zip-tie
12. Extend all pistons again
Repeated pumping of the brake lever, with the bike off, to accomplish this again. Extend all four pistons about 1/4 inches.
13. Repeat steps above 7-12 again
Now you've got "diluted old fluid" in the caliper. Repeat the above steps to get rid of the diluted stuff.
a. Repeat as necessary, until all brown fluid and gunk is gone.
Keep repeating until the fluid is perfect.
b. When that is done, Do not do step 12 (extending the pistons) the last time
14. Clean left side pads and rotor with brake cleaner
15. Reinstallation of left caliper
a. Install pads and retaining pin
b. Replace split pin
c. Replace retaining plate
d. Replace caliper on rotors
e. Torque caliper bolts--30 nm
16. Operate brake several times to extend pistons and set pads against rotors
Turning on the bike and using the servo motor would be OK this time.
D. Flushing fluid from right caliper
Follow the instructions for the left caliper (Section C steps 1-16, above). It would simply be a waste of time to repeat the instructions. It is exactly the same aside from the sensor wire restraints which are not present on the right side.
E. Final check on fluid level
Fill if necessary
1. Replace reservoir cap
That should do it. The control circuit procedure and everything else from the standard procedure can be followed from this point. Return the the first page and begin section IV.
From now on do the service on time, and follow the easier standard procedure. 
I was dreaming when I wrote this, forgive me if it goes astray...