Routine Maint. Valve Check
Posted: Tue Nov 19, 2013 11:11 am
This will have been the third time I've had Lil Chubb dressed down to the valve cover. Quite a task too. Plastic side panels and middle panel removed, front beak removed, battery removed, airbox removed, various connections and zip ties removed, throttle cable detached, and let's see...what else? That entailed what seemed like a dozen or so screws and nuts taken off and stored in various places around the shop and with the parts that came off.
Finally! Down to the valve cover!

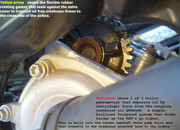
The valve cover itself is bolted down with four bolts that have metal and rubber washers and only go on with 10NM of torque. They were easy to take out. The trick is actually removing the cover once it is unbolted. Its like working one of those little wooden and rope puzzles that are impossible to do. There is only ONE way this thing comes out between the frame members and other obstacles, and it always takes me about 20 or 30 minutes to figure it out. When I do, I always say, "Damn! How come that was so hard?"
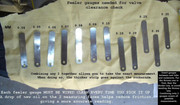
I have about three sets of automotive feeler gauges and to do this I think I had all the ones within the range of the valve lash specs, plus the smaller ones, laid out to use. Intake specs are between .18mm and .26mm. Exhaust specs are between .27mm and .35mm

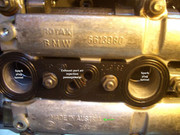
I got cylinder one valves closed and measured those first. Still pretty much the same as when I checked it last time: Intake at .23mm for both and exhaust at .31 and .32 (left and right) When I got the engine rotated so that the cylinder two valves were closed I got different readings on cylinder two: Intake was still .23 and .22 (left and right) but exhaust felt tight! I managed to come up with a reading of .29 and .28 (left and right) after rotating the engine a second time to make sure I was at the good spot. This alarmed me somewhat so I came inside and called Cyclerob. I needed him to help me interpret my data.
Rob cited a phenomena with Hondas from his days wrenching on them, where the cam bearing would wear on high mileage bikes and require the use of a special took to pry the cam upward slightly to take a valve lash reading. This, in essence, would give a more "real" spacer reading. He suggested I use a screwdriver or something and pry up on the cam a little to take a reading. Due to the spacing it was inpossible to get any kind of leverage on the intake cam, but I managed to get a small pry bar under the exhaust cam and put some upward pressure on it. Not much! I was afraid of pulling up too hard. I just needed to take up any tiny amount of play in the bearing. Indeed I got a second reading of .31 and .30 (left and right)...what is that? 3/100 of a mm difference? Not enough to worry about, in my estimation.

Well, after I went out and did that, I came inside and Rob had called back and left a message that I didn't need to do that. That BMW had provided something to account for the cam bearing play. Rob can chime in here and explain that if he wants to. I just knew it really was not necessary now and the first reading was my true reading. It means that next time I check I will probably need to replace the tiny adjustment shims.
Once I was happy that all was okay for a while longer I cleaned the gaskets well with brake cleaner, reinserted the outer gasket into the cover, put some RED RTV on the areas around the round extended sections of the gasket and very carefully slid the cover back in place, making sure the tiny round rubber seal/gasket on the right side did not get disturbed or kinked as the cover moved down in place beside it. I like to use red RTV so I can see where it is when it come oozing out. I cranked it down until the bolts bottomed out and let it set up for a while, then put the required 10nm of torque on them. The reason I use the RTV is, number one, it is recommended, and number two, after the first time I took the cover off and replaced it, I had oil weeping out at those locations before the next valve check time. Now I don't have that happen.

The whole thing is buttoned up now and today I will slowly and carefully replace all those parts, screws, bolts, zipties, etc. cleaning things up as I go.
I hope this helps anyone who is pondering doing a valve check on this engine. The hardest part, by far, is getting that damn cover out of place after it was unbolted. Remember! There is only ONE way it is coming out. Slide it toward the front, left up on the back and move it straight back and up almost without turning it at all.

Finally! Down to the valve cover!
The valve cover itself is bolted down with four bolts that have metal and rubber washers and only go on with 10NM of torque. They were easy to take out. The trick is actually removing the cover once it is unbolted. Its like working one of those little wooden and rope puzzles that are impossible to do. There is only ONE way this thing comes out between the frame members and other obstacles, and it always takes me about 20 or 30 minutes to figure it out. When I do, I always say, "Damn! How come that was so hard?"
I have about three sets of automotive feeler gauges and to do this I think I had all the ones within the range of the valve lash specs, plus the smaller ones, laid out to use. Intake specs are between .18mm and .26mm. Exhaust specs are between .27mm and .35mm
I got cylinder one valves closed and measured those first. Still pretty much the same as when I checked it last time: Intake at .23mm for both and exhaust at .31 and .32 (left and right) When I got the engine rotated so that the cylinder two valves were closed I got different readings on cylinder two: Intake was still .23 and .22 (left and right) but exhaust felt tight! I managed to come up with a reading of .29 and .28 (left and right) after rotating the engine a second time to make sure I was at the good spot. This alarmed me somewhat so I came inside and called Cyclerob. I needed him to help me interpret my data.
Rob cited a phenomena with Hondas from his days wrenching on them, where the cam bearing would wear on high mileage bikes and require the use of a special took to pry the cam upward slightly to take a valve lash reading. This, in essence, would give a more "real" spacer reading. He suggested I use a screwdriver or something and pry up on the cam a little to take a reading. Due to the spacing it was inpossible to get any kind of leverage on the intake cam, but I managed to get a small pry bar under the exhaust cam and put some upward pressure on it. Not much! I was afraid of pulling up too hard. I just needed to take up any tiny amount of play in the bearing. Indeed I got a second reading of .31 and .30 (left and right)...what is that? 3/100 of a mm difference? Not enough to worry about, in my estimation.
Well, after I went out and did that, I came inside and Rob had called back and left a message that I didn't need to do that. That BMW had provided something to account for the cam bearing play. Rob can chime in here and explain that if he wants to. I just knew it really was not necessary now and the first reading was my true reading. It means that next time I check I will probably need to replace the tiny adjustment shims.
Once I was happy that all was okay for a while longer I cleaned the gaskets well with brake cleaner, reinserted the outer gasket into the cover, put some RED RTV on the areas around the round extended sections of the gasket and very carefully slid the cover back in place, making sure the tiny round rubber seal/gasket on the right side did not get disturbed or kinked as the cover moved down in place beside it. I like to use red RTV so I can see where it is when it come oozing out. I cranked it down until the bolts bottomed out and let it set up for a while, then put the required 10nm of torque on them. The reason I use the RTV is, number one, it is recommended, and number two, after the first time I took the cover off and replaced it, I had oil weeping out at those locations before the next valve check time. Now I don't have that happen.
The whole thing is buttoned up now and today I will slowly and carefully replace all those parts, screws, bolts, zipties, etc. cleaning things up as I go.
I hope this helps anyone who is pondering doing a valve check on this engine. The hardest part, by far, is getting that damn cover out of place after it was unbolted. Remember! There is only ONE way it is coming out. Slide it toward the front, left up on the back and move it straight back and up almost without turning it at all.


