Page 1 of 1
R1150r rear fender elimination
Posted: Fri Feb 03, 2017 12:56 pm
by MThomas
In the interest of aesthetics I'd like to eliminate the rear fender but I haven't found a kit online and not really much in the way of DIY (my preferred choice since it's cheaper).
Has anyone successfully done a rear fender elimination?
How did you do it/what did you buy, etc.
Re: R1150r rear fender elimination
Posted: Fri Feb 03, 2017 5:16 pm
by EasyBee
instead of stupidly asking, why not use the search option on the top of this board, you'll find this
viewtopic.php?f=2&t=23749&p=207457&hili ... on#p207457
Question : where do you put the number plate?

Cyclerob did it and wrote about it in this topic
http://www.r1150r.net/other.html
Better option, because of the number plate.
Re: R1150r rear fender elimination
Posted: Sat Feb 04, 2017 1:30 pm
by sweatmark
Rear fender chop was the popular choice during the old message board era.
Soliton's custom Roadster is perhaps the best example out there, but evidently required extensive modifications.
There is no fender-removal kit that I know of.
Re: R1150r rear fender elimination
Posted: Sat Feb 04, 2017 5:52 pm
by wncbmw
Just cut if off evenly below the license plate. Just know that any riders following too close in the rain are going to get sprayed!
Re: R1150r rear fender elimination
Posted: Sun Feb 05, 2017 10:23 am
by MThomas
This is neither what I want nor does it provide a step by step guide. The second link is closer. I'll just figure it out.
Re: R1150r rear fender elimination
Posted: Mon Feb 06, 2017 6:29 pm
by swamper
You'll find in a year you wish you hadn't removed it.
Re: R1150r rear fender elimination
Posted: Tue Feb 07, 2017 4:00 pm
by EasyBee
Yep, when riding under wet conditions, the spray from the rearwheel will cover your entire back. You'll be soaking wet from the rain on the frontside and the spray on the backside. Enjoy.

But it'll be aesthetic wet.
Re: R1150r rear fender elimination
Posted: Tue Feb 07, 2017 5:50 pm
by trickytree
Yup, my Rockster came with the rear fender cut down......couldn't believe how so much poo I got covered in after a wet ride.
Re: R1150r rear fender elimination
Posted: Wed Feb 08, 2017 2:42 pm
by MThomas
EasyBee wrote:when riding under wet conditions, the spray from the rearwheel will cover your entire back.
I do ride in the rain so I think based on that the decision is clear to not pursue
Re: R1150r rear fender elimination
Posted: Wed Feb 08, 2017 4:02 pm
by swamper
Good decision. I'm sure you guys do realize the mud flap is adjustable!
Re: R1150r rear fender elimination
Posted: Wed Feb 08, 2017 6:37 pm
by wncbmw
I have had mine cut down for, oh, about 10 years, and don't notice any exceptional spray on my back. People following closely however, that's different!

I suppose it would be controlled by just how close you cut it though. I left a significant portion below the license plate.
And I ride in the rain whenever it is required!
Re: R1150r rear fender elimination
Posted: Sat Feb 11, 2017 10:54 am
by Tundra Dweller
Had a Suzuki SV-1000S and removed the rear fender. Even with a "hugger" I got the skunk stripe up my back, even permanent tar oil blobs.
The rear tail light and fairing looked like it was sand blasted over time. Worst mod I ever did.......
Re: R1150r rear fender elimination
Posted: Sun Feb 12, 2017 5:42 pm
by towerworker
To respond like you did is pretty rude. No question is a stupid one no matter how many times it's asked. I would like to think that we (and hopefully you) are better than that.
Re: R1150r rear fender elimination
Posted: Tue Feb 14, 2017 5:09 am
by Soliton
G'day mate,
I did a rear fender removal. Unless you are dead keen, DON"T The bike is on page 8 of the photo gallery. It looks a tad different now but that image will suffice for the discussion.
Everything locks into something else. I had to rebuild the subframe. hand build the tail, and the section that comes off with the key, all the electronics in the tail and the entire underbody. I did this job FIVE times to get it to a point that I was happy with. It has a number plate mount and the plate is lit from above by an LED built into the rear housing. There is also a Puig hugger.
When it rains....I still get a skunk stripe
That said, I love it and am super happy with the result, but it wasn't for the faint of heart.
Next stop....spoked wheels. Finally worked out how to do it. Woody's have made em. I have got em, just gotta save the cash for new tyres and fitting.
Good luck
Sol
Re: R1150r rear fender elimination
Posted: Wed Feb 15, 2017 3:45 pm
by EasyBee
towerworker wrote:
To respond like you did is pretty rude. No question is a stupid one no matter how many times it's asked. I would like to think that we (and hopefully you) are better than that.
Thanks for your comment Towerworker.
I won't react to any other questions from TS.
Re: R1150r rear fender elimination
Posted: Tue Feb 28, 2017 11:25 am
by brownj
I cut mine - not total removal. I haven't noticed any issue with riding in rain.
http://s562.photobucket.com/user/brownj ... C04869.jpg
Re: R1150r rear fender elimination
Posted: Tue Feb 28, 2017 11:30 am
by brownj
Re: R1150r rear fender elimination
Posted: Fri Apr 07, 2017 8:25 pm
by Soliton
Torsten,
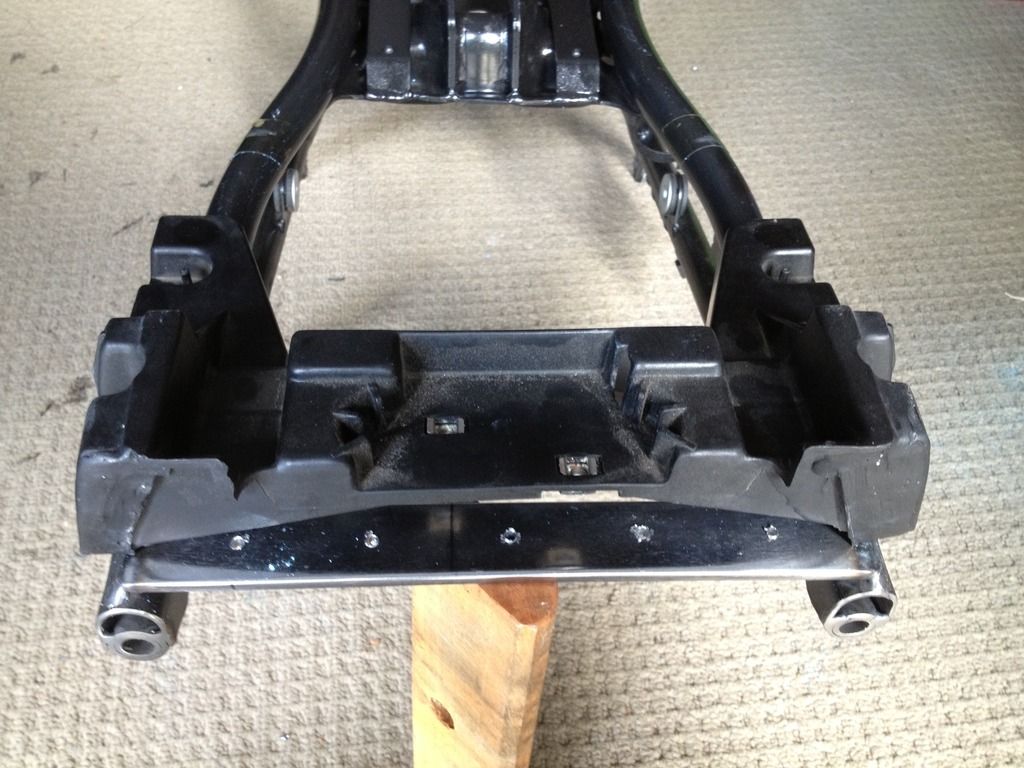
Here are the images you asked for showing the sub-frame modification I used to achieve a single seat on the R1150R.
One shows the "raw" cuts and the other shows a later more finished shot.
My brief was to build something that looked different, but as much as possible looked as if it came from the factory. The factory style seat mounts had to remain and it had to be done in a way that did not require engineering certificates or contravene the national design rules. (The fully enclosed neutral indicator display panel at the back may be skating on very thin ice in that area) Everything from the seat back is now custom.
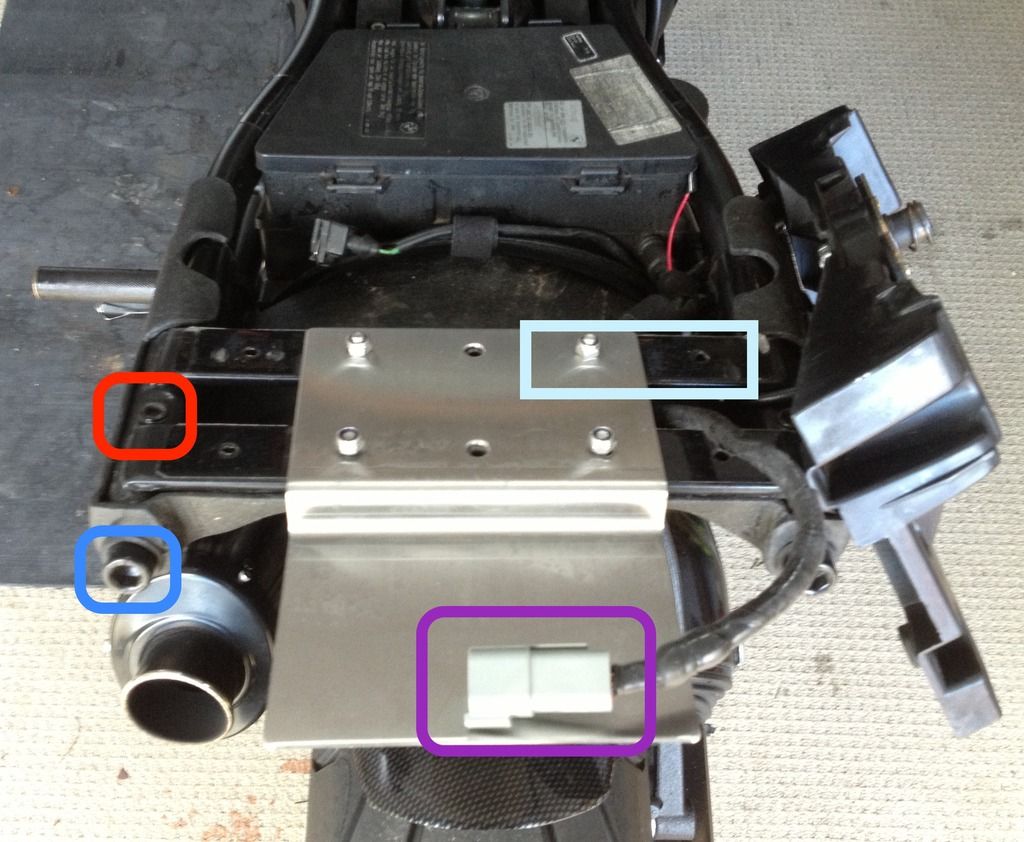
The red rounded rectangle shows the pre-existing mounting point for the key locking seat retainer. This will give you an idea of where the frame was cut. The plastic seat retainer had to be shortened, cleaned up and re-polished.
The blue rounded rectangle shows the end of the subframe (the point at which it was cut) If you have never cut these frames, be warned, they are double sleeve tubing this means the steel in MUCH thicker than you might think
Steps :
1 - Remove the subframe in its entirety,
2 - Remove the passenger peg mounts and polish out all remnants of the extant web points
3 - Weld on the two cross braces one shown in pale blue rectangle (30mm x 5mm)
4 - Weld on an abridged muffler mounting point, and polish the frame.
5 - Threaded the ends of the sub frame to accept an M12 cap head bolt to provide a neat "factory looking" finish and give a mounting point for the underbody work.
6 - Powder coat the sub frame.
The underbody was then built using 2mm Kydex. It is designed to slide on and is then bolted in place using the 12mm stainless cap heads bolts shown in dark blue. The bolts were also powder coated to match the sub frame.
The stainless mounting plate for the tail is now black and matches the rest of the sub frame. It was built out of 2mm stainless steel. The electrical connectors were replaced with a heavy duty multi pin Deutsch connector. I also rebuilt all of the tail indicators, brake lights etc to use socketed LEDs.
Sol
