
Before you start, the suspension's static and rider sag has to be determined so you'll know if heavier springs will be needed and what spring spacer length modification you should do. My measurements said stock spring is OK but 10mm additional spacer is needed along with a 10mm higher forktube height in the triple trees. Simple stuff, easy to do. Since the GoldValves add 12mm to the preload stack, I elected to use the stock spacer, even though it's now 2mm too long. That 2mm will soon be eaten up with normal spring sag with age.
After waiting for the GoldValves and then the 15W forkoil that both had to be ordered, it also began raining for the next SEVERAL days. Cool. Take it apart now!
http://i142.photobucket.com/albums/r87/ ... dVlv-1.jpg
http://i142.photobucket.com/albums/r87/ ... dVlv-4.jpg
http://i142.photobucket.com/albums/r87/ ... dVlv-3.jpg
http://i142.photobucket.com/albums/r87/ ... dVlv-2.jpg

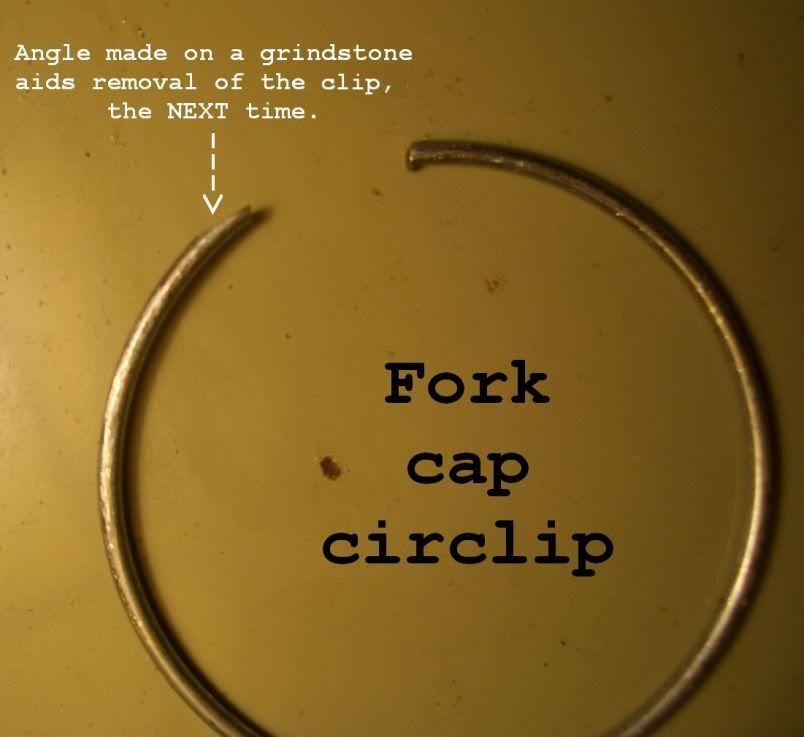
I clamped the forktube (1) vertically between short 2x4 wood stud pieces in the 5" vise and easily removed the top circlip (4) with a tiny slender screwdriver blade after pushing down on the fork cap (3) with a 3/8ths drive T handle in my left hand. Remove the spacer (5), then the thrust washer (6) & spring (7) with an old wheel spoke as a grabber tool. I raised the spring slowly so the fork oil drains off it, then just tilted it into paper towels and stored it on the newspaper's sports section.
Next I took the fork leg assembly off the vise and poured the oil out the top while pumping the fork slider
stop-2-stop about a dozen times. I left them in an inverted 45deg angle tilt-to-drain for an hour while I cleaned up & had lunch.
Back into the vise, forktube in a horizontal position to remove the bottom damper rod bolt (11) with my air impact wrench. If you don't have one, it's best to loosen the bottom bolt first, before taking the top cap off. Do so with the tube tilted so the bottom bolt is a half foot higher than the top cap, to move the oil pool away. The reasons for loosening the bottom bolt first are:
--The bottom bolt has blue Loctite on it. Blue is removable without heat, but it requires extra removal torque.
--The damper rod (8) it screws into can turn freely inside the fork if/when the spring preload is removed by taking the top cap off.
--Leaving the top cap on, then loosening the bolt provides some damper rod turn holding power.
--If it continues to turn internally without unscrewing because of the Loctite's thread bonding, have an assistant compress the suspension slider as much as possible while you spin the Allen socket with your ratchet or a speed wrench. Work slowly and push hard into the shallow Allen headed bolt being vigilant you remain perfectly axial so you don't chew up the bolt's Allen head.
The problem with removing the bottom bolt first is the oil leaks out the bottom bolt hole and makes a mess . . . even if you have a large drainpan. The good part is that it's much easier to remove the top circlip with the spring preload released after the bolt is removed. After the clip is removed, you can compress the suspension to push the top cap out.
OK, you got the bottom bolt out and the oil ran out too. Remove the top fork cap, then use the fork slider travel to eject the spring. Finally, tip the bottom end high and the damper rod & it's top-out spring will fall out. Keep the slider fully compressed onto the forktube so the hydraulic stop cone (2) doesn't tumble out of position and/or flip over.
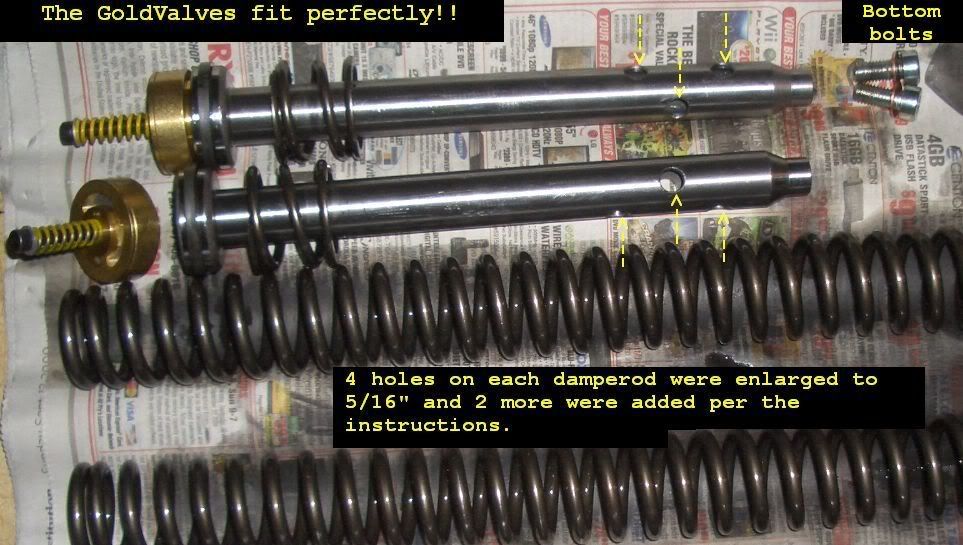
The instructions say to enlarge the damper rod's big compression holes that are there and drill 2 more. Then debur all 12 holes, inside and out. THAT is the most irritating, time consuming operation of the whole job. It's a good time to remove all the Loctite thread residues so they do not degrade the installation torque value. An 8 x 1.25mm tap into the damper rod and a wire brush on the bolt threads worked well for me. The larger and additional damper rod holes are needed to completely disable the old primitive damping system so the new and sophisticated GoldValve system works properly.
Now you need to loosen and apply 2 turns (for street riding) of GoldValve spring preload, then boxwrench tighten it's locknut. Time is ticked away towel cleaning the internal bore of the damper rod, then spray cleaning and blow drying it. All internal parts MUST be very clean, or kept clean, because the small oil supply will circulate any trapped/hidden abrasive dirt/chip contaminates for YEARS!
Reinstall the top-out spring onto the damper rod, then insert it into the forktube. Look down thru the inside of the tube and hopefully you'll see completely thru the bottom bolt hole, confirming the hydraulic stop piece (2) is properly in place. If you see darkness or a bright lite shows an Aluminum piece, you'll have to reorient it thru the bottom hole access WITH THE CONE SIDE FACING UP. Plan B is remove the fork slider, but that operation traumatizes the top bushing and forkseal while requiring a seal driver for reinstallation of both again. Put blue Loctite on the bottom bolt's threads. Temporarily put the main spring, thrust washer with it's sharp edges UP and the spacer in to hold the damper rod from turning while tightening the bottom bolt. Use a clean rag against them and compress the suspension to apply more turn holding force on the damper rod (what the bottom bolt screws into).
Once they're together it's time to add the 15W fork oil. The stock 10W oil is too thin. With the fork vertical in the vise, slider toward full compression, add oil to about 10" from the top. Then pump the slider stop-to-stop until the air cavitation noises stop . . . . . . about a dozen times. Work it hard to the springy top-out and hydraulic bottom-out hard metal stops. Any trapped air that works out riding the bike will subtract from the required oil level. Then drop in a GoldValve with the spring up. Pump the slider some more to purge trapped air. Finally, compress and hold the slider all the way thru the slow moving hydraulic bottom-out stop to it's mechanical (metal-to-metal) stop and restrain it there with a bungee cord.
Now you have to accurately set the oil level with a special tool you purchase for $50---$100 -or- creatively create your own special tool from commonly available parts like this:
http://i142.photobucket.com/albums/r87/ ... etTool.jpg
The procedure is to quesstimate 120mm and add oil to just above that level, then suction out the overfill with your tool set to 120mm.
Release/extend the forktube slider, add the spring, washer (sharp edges up), new length spacer . . . then the cap and retainer clip. Put everything back together onto the bike. My new forktube height is 12mm stock + 10mm additional required = 22mm above the top triple tree. I haven't ridden it yet, but I know it is right and ready to blast !
BTW, anyone determined to do this job themselves, PM me so I can coach you over the phone before/during the job or when help is needed. It's very easy if you have taken forks apart before, but could seem huge and difficult if you have not. In my shop this was normally a 2hr job, but I took my time here and spent 3x that. The words above covered the important things that could trip you up, like the (inaccessible) internal hydraulic stop cone tumbling over and easy ways to restrain the (inaccessible) damper rod from turning. Also be careful the tubes do not fall over and get nicked in the seal travel area. That would mean a new $348 chrome forktube and the labor to change it!
EDIT on Nov 19th to add clarity and fix source changed target links.
.